

I Hate the Drift Method!
I've always been impatient with the drift method of polar alignment, so I've been trying to come up with something a little more interesting and positive. When I was an astronomy student at Pomona College, (Oh, so long ago!) we did polar alignment using a photographic method. Basically the idea was to run an exposure with the drive stopped to get a star trail with its center at the true pole. Then we ran the drive at twice sidereal rate to get a star trail who center was approximately the pole of the telescope. When you develop the film you get two star trails. The center of one arc is the true pole and that of the other is the misaligned pole (approximately, at least). You can measure the photographic plate and figure out how far to move the pole and in what direction.
The figure below shows how it works for east-west misalignment (and incidentally how to make the CCD plate shown later). The whole principle is that the star trail is centered on the true pole with the drive stopped and on the pole the telescope mount's pole with the drive running at twice sidereal rate. If the two poles are right together, then the two star trails superimpose. The angle a between the two traces is the same as the angle between the perpendiculars to the arcs that point to the true and misaligned poles. The spherical trig shows that the true pole is acos(d) east or west of the true pole, where a is the angle between the star traces and d is the declination of the star used to make the trails. If you use a star on the equator, then the telescope's pole is a degrees east or west of the true pole.
.
Do it With A CCD
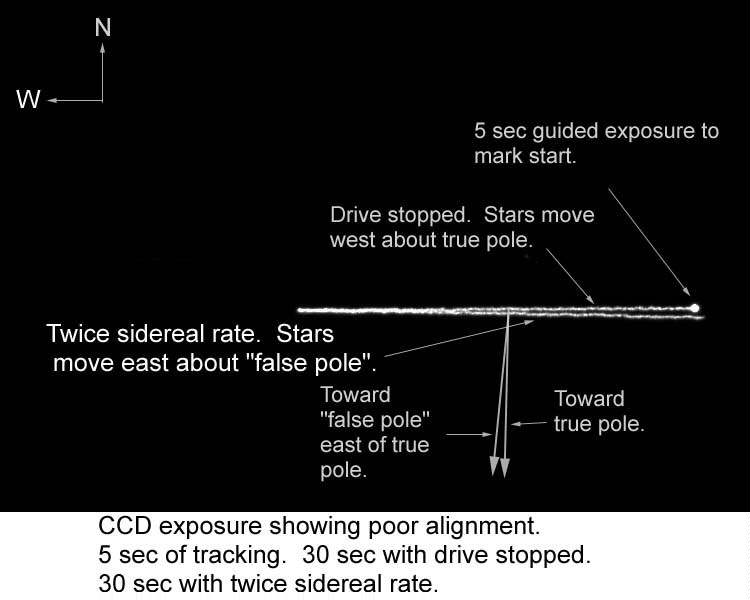
I decided to see if the same thing would work with a CCD. I'm using an ST-7 SBIG camera on a 10 inch LX 200 with a celestron reducer corrector. The combination operates at f/6.3. I had an AO device in the optical path, but didn't use it for the exposure below. This exposure was taken on a star near the equator and nearly on the meridian. First I exposed with the drive tracking for 5 seconds. That gave the bright star image at the left of the exposure. Then I turned the drive off for 30 seconds. On the LX200 this is accomplished by holding down the "E" button with the slew rate set at "guide". This produced the track extending about half the way across the CCD field from east to west. Then I quickly switched from the "E" to the "W" button and ran the drive at TWICE the sidereal rate. This produced the second track from west to east. The tracks look straight because the CCD field is so small, but they are actually arcs of star trails. The east-to-west track is centered on the true pole because the drive wasn't running while it was laid down! The return west-to-east track is centered approximately on the misaligned pole. The exposure is shown below.
Use the CCD to Tweak Alignment
Because the CCD field is so small, the star trail arcs look like straight lines. The perpendicular to the east-to-west track points to the true pole and the perpendicular to the west-to-east track points to the misaligned pole. The figure above shows that the false pole is west of the true pole. You can do the spherical trig to find out how far, but I just used the focus mode of the CCD with about a 0.11 sec exposure time and tweaked the azimuth adjusment on my super wedge to move the star that I used to generate the trails about half way across the field of the CCD toward the west. That moved the telescope pole toward the east. The long axis of the field of the CCD (which I set up as the east-west axis) is only about 14 arc minutes, so this is a pretty good way to measure a small tweak of polar position. The figure below shows two sample "tweak" images. Note these have no dark frames subtracted and were 0.11sec exposures on a fairly bright star. The advantage of tweaking the polar axis position this way is knowing how much you moved it very accurately. This makes closing in on a "perfect" alignment fairly easy.
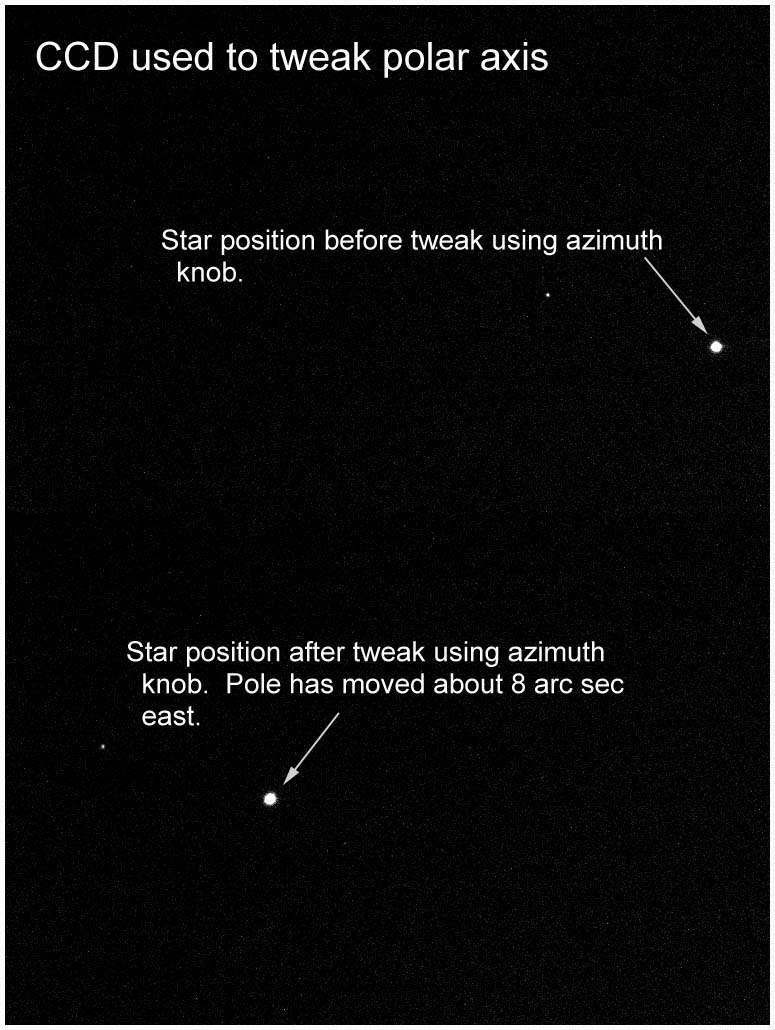
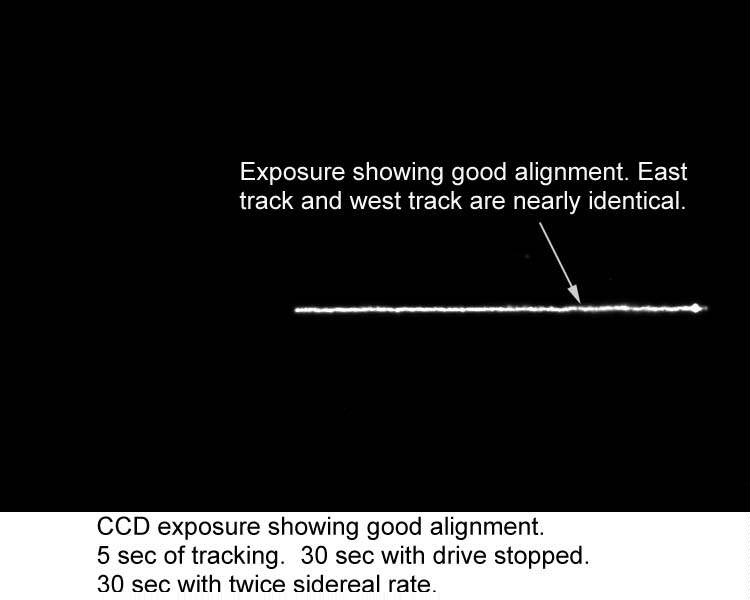
After repeating this tweak maneuver a couple of times, I got the exposure below which shows pretty good east-west alignment. That is the two trails are right on top of each other! I repositioned the star on the eastern edge of the CCD field between tweaks using the hand control.
These exposures were registered in MIRA and exported as TIF files. Then I converted them to JPEG form and added the captions and labels in Photoshop. The approximate aspect ratios of the original exposures have been preserved. Since you aren't interested in pretty pictures, just geometry, you don't need a dark frame.
A star near the horizon gives you north-south misalignment.
To get north-south alignment, you repeat the process with a star close to the horizon. The pictures look just the same, but you tweak the altitude adjustment knob!
What is the Accuracy?
If you assume you can line up the two traces to within about one pixel, then the smallest angle between the trails (if the trails stay on the CCD) you can detect is roughly 1/500 radians. (The theoretical best would be 1/750 for the ST-7). The angular misalignment between the poles is given by the angle between the traces times the cosine of the declination of the star used to make the trails. Thus the angle you see on the screen between the traces is the angle by which the pole is misaligned (if you are using a star near the equator). (1/500 of a radian corresponds to an angle of about a tenth of degree.))
You can increase the accuracy by exposing to get longer trails. Once you have gotten the alignment as close as you can keeping the trails on the CCD, you can increase the exposure time so that the trail runs off the CCD and then runs back. Exposing 5 seconds guided, 2 minutes drive off, 2 minutes at twice sidereal rate, for example.) This would improve the accuracy to whatever degree you want. For me the advantage of this method over the standard drift method is a visual presentation which lets you know quickly whether you have good alignment, and if you don't, it helps you achieve one by facilitating accurate tweaking of the polar axis by a known amount.
Finally thanks to Professor Paul Routly, one of the best teachers I ever had, for all those astronomy labs!